Feel free to link to this tutorial and print for your personal use but please do not copy it to place online, re-write or claim as your own.
Thanks! -Diamond Debbie- August 16, 2002
Supplies Needed:
Paint Shop Pro 7: Get a free trial version of PSP Here
(Paint Shop Pro 7 is what I use.. I am sure you can do it with whatever version you are on.. you may just have to do it a bit differently)
First of all, let me say, that I am sure that each person has their own way of doing things in PSP.. there is never just one way.. I wrote this tutorial the best way I could to make it easier on newbies to psp. Advanced users of course may find a way to do it quicker. I hope you don't run into any problems along the way. If you do, don't hesitate to ask for help.. I will help in any way I can. :)
Ok.. Let's begin!
First, set up your work area by opening up the contents of the zip file onto your canvas and minimize them... you will be using them soon.
1.) Open a new Image; 400x300 Transparent Background
2.) Layers / New Raster Layer - Name this Layer "Background" and floodfill with White.
3.) Add another Raster Layer naming this layer "Bracelet".
4.) Click on your picture tube tool icon and find the Bracelet Tub that you wish to use and set the Scale to 80. Using the "Mover" tool, Place this near the top center of your canvas.
5.) Go to File/Open and find the Clasps you downloaded and open both of them in PSP.
6.) Right click on Clasp 1 and Copy. Now go to your Canvas and Paste as new Selection. Place the clasp on the right-hand side of your bracelet. - Selections / None when finished.
Do this same thing with Clasp 2, placing it on the other side of the Bracelet. - Selections / None.
Now you can close both Clasp Images.
7.) Add a new Layer - Name this layer "Gold Link"
8.) Click your picture tube tool and find the Gold Link Tube and set the scale to 40. Place the gold link anywhere on your canvas.
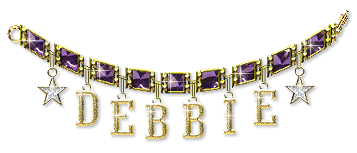
9.) Now go to your Layer Pallette and right click on the Gold Link Layer and duplicate. Do this as many times as you need too for the amount of letters you will be using. In my case for the name "Debbie".. I needed to maked 5 copies of the gold link for a total of 6.
10.) Ok.. Once you have all your copies made, make sure you have the main "Gold Link" layer highlighted.
Click your Magnifying Glass and Zoom in on your image once.
Maximize your canvas and make sure you can see everything on it.
11.) Click on your mover tool and grab the Gold Link and drag it to the part of the bracelet you want to add your first letter too.
Be careful to click ON the link and not your background. You will see you have a stack of links.. just drag them one by one to the spots they need to go.
12.) Once you have each link in place, you can now click on restore..(same place you went to maximize) and right click on your canvas with the zoom tool to go back to normal viewing size.
13.) Now Go to your Layer Palette and you will see some little sunglasses next to each layer. Click on the sunglasses for Layer 1, Background and Bracelet.. X'ing them out... Now only the gold links should be showing on your canvas.
14.) Layers / Merge / Visible
15.) Now go back to your Layer Palette and un- X Layer 1, the Background and your Bracelet so you can see everything again.
Your Merged Layer should be highlighted.
16.) Add Another Layer - Name this layer whatever letter you will be using first.. For example.. mine would be the letter D.
17.) Click on Picture Tube tool and find the Gold Letter that you will be using. Scale at 40 and place on a blank area of your canvas.
Now.. Using the Mover tool.. drag your letter to the first Gold link and attach it.
18.) Add another Layer naming this one the second letter (E) and repeat the same step as above for each additional letter. Remember to name each one so that you don't lose track.
(Time saving Hint: If you have a name like mine, with two of the same letters, you may duplicate the first using the same method as we used when duplicating the gold links!)
19.)Once you have all of your letters in place... Go to your layer palette and once again, clicking on the sunglasses, X out Layer 1, Background, Bracelet and Merged. You should now only see your gold letters on the canvas.
20.) Layers / Merge / Visible
21.) Take a breather... ;)
22.) Now you can turn the visibility back on for all layers.
23.) Add a New Layer - Name this layer Charm1
24.) Click on your picture tube tool and choose the first charm you would like to use. You will need to experiment with different sizes /scale sizes... until your charm looks the right size.. Depending on the charm you decide to use. For this tutorial I used a Star Charm sized at 45.
Most will range between 40 and 60.
25.) Place the charm on a blank area of your canvas and then using the Mover tool.. place it on one of your empty "hooks".
26.) Once you have your first charm in place..
If you wish to duplicate it to use on the other side of your bracelet...do so now.. If you want to use a different Charm... skip to step # 28
27.) In the Layer Palette, Right click on the Charm1 layer and duplicate..
Now go to Image / Mirror and you will see the other copied Charm.. place it on the desired hook.
If you chose to use the method in step #27.. and you have no other empty slots on your bracelet.. Skip to # 29. If you still have empty slots to fill.. Continue.
28.) Add new layers one by one, naming them Charm2, Charm3, etc.. depending on how many more charms you need and follow the same steps as in step #24.
29.) Once you have all your charms placed and your bracelet looks complete... go to your Layer Palette and X out your "Background" layer only.
30.) Layers / Merge / Visible
31.) Effects / Sharpen
32.) Effects / 3D Effects / Drop Shadow - using the setttings below:
Vertical, 2 Horizontal, 2 Opacity, 50 Blur, 3.7 Color #808080 or "Dark Grey".
33.) Go to you Layer Palette and make your Background visible again or delete it if you would like to make your bracelet transparent. I personally prefer to keep the background so that it hides any sparkles that may go "out of the lines".
34.) Now it is time to crop your image.. Choose your crop tool and crop the image to a nice size.. be careful not to cut your bracelet! Leave a little space on all sides so that your shadows and sparkles wont be cut off too.
35.) Layers / Merge All (Flatten)
36.) Now make a couple copies of your image. Shift + D.. twice.
37.) Now, doing each copy individually, click on your tube tool and find your sparkle tube.. I have mine scaled at 30. Of course this can be adjusted to taste. Add random sparkles to your bracelet, letters and charms. (You will be adding more sparkles to your two copied bracelets.. so remember to save space for them..
38. Once you have finished adding your sparkles, Go to File / Save As and find a place to put this original bracelet..
(I make a folder named "Charm Brac Temp" or something and place each one in that folder so that it can be found easily.)
39.) Name the first one Image1 and save as PSP file. Keep this image open so you can see where you placed the sparkles on it and then open your second copy.
40.) Add sparkles to your second copy trying to place them in places that you didnt in your original.. Save this one as Image2.psp.
41.) Do the same thing with this last copy. Save as Image3.psp.
42.) Once all three have sparkes and have been saved.. you may close them all.
43.) Take a Breather!.. Almost Done!
44.) Launch Animation Shop
45.) File / Animation Wizard
Settings;
Save as first image frame - next
Transparent - next
Centered in the frame , With the Canvas Color - next
Repeat animation indefinitely,
The number in the box should be set at 20. - next
46.) Click on "Add Image" and find the folder that you placed your Bracelet Images in and highlight them all and click "Open".
Now place the images so that the top image is Image3 and then Image2 and lastly Image1. Click Next - Finish.
47.) You will now see the 3 frames of your Bracelet in Animation Shop.
Click on View / Animation and you will now see your Animated Charm Bracelet! Ok.. enough.. staring ... close the animation box. ;)
48.) To make sure that your animation does not have "jumps" in it... and to change your sparkles to move faster or slower, Click on Edit / Select All.. then go to Animation / Frame Properties and change the 20 to a faster or slower speed if you wish.
(example; 30 would be slower, 10 would be faster.)
Or just leave it as is and click OK.
49.) View / Animation once again and if you like the way your bracelet looks.. File / Save As and save your bracelet as a GIF file to someplace you won't lose it. Your slider should be set to better image quality.. Next - next - next.. Finish!
50.) Close PSP, Animation Shop and go show off your new Charm Bracelet!! :) Looking forward to seeing your creation! Great Job!
Thanks goes to:
Joyce Kohl and Carol Green of Pixelating.Com/Joyce Kohl Treasury : http://greenway.greenwinds.net/Kohl/,
and to Fran of Havasu Hideout : http://www.havasu.fsnet.co.uk/havasu/index/index.html for permission to use their tubes and to post them for use in this tutorial.